
"Building Your First Jenkins Declarative CI/CD Pipeline for Deploying a Django Notes App on AWS EC2"


💡 Introduction
Welcome to the exciting world of DevOps! In this blog post, I'll guide you through setting up your very first Jenkins Declarative CI/CD pipeline to deploy a Django Notes application on an AWS EC2 instance. Whether you're a newcomer to the world of Continuous Integration and Continuous Deployment (CI/CD) or looking to expand your skills, this step-by-step guide is designed with beginners in mind.
💡 Prerequisites
AWS Account: Ensure you have an active AWS account. If you don't have one, you can sign up. Don't worry; there's a free tier available that you can use to follow along.
Basic Knowledge of EC2: Familiarize yourself with Amazon EC2 (Elastic Compute Cloud) concepts. If you're new to EC2, it's Amazon's virtual servers in the cloud. You can learn the basics on the AWS site.
👉 What is Jenkins Declarative Pipeline?
Jenkins is a popular open-source automation server used for building, testing, and deploying code. The Declarative Pipeline in Jenkins is a way to define an entire build/test/deploy pipeline in a Jenkinsfile, using a simplified and structured syntax.
👉 Our Project: Django Notes App
We'll be deploying a simple Django Notes application. This hands-on experience will help you understand the complete flow from source code to deployment in a controlled and automated manner.
💡 Starting Ec2 Instance
Navigate to the AWS Management Console and go to the EC2 dashboard.
Click on "Launch Instance" to create a new virtual machine.
Choose Ubuntu (AMI) for your instance, and select an instance type (t2.micro) that suits your application's needs.
Add tags for better identification, and configure security groups to allow SSH access.
Review your configurations and click "Launch."
Connecting to EC2 Instance via SSH:
Once your EC2 instance is running, select it from the EC2 dashboard.
In the instance details, find the public IP address or DNS name.
Open a terminal on your local machine.
  chmod "your-key.pem" 400
  ssh -i "your-key.pem" ec2-user@your-instance-ip
If you are using a different operating system or connecting from a different environment, adapt the command accordingly.
💡 Installing Jenkins on Ubuntu machine
Step 1: Install Java Development Kit (JDK):
Jenkins is built on Java, so the first step is to install the Java Development Kit. We recommend using OpenJDK, a free and open-source implementation of the Java Platform.
sudo apt update
sudo apt install openjdk-11-jdk
To verify the installation, run:
java -version
You should see information about the installed Java version.
Step 2: Install Jenkins:
Jenkins is not available in the default Ubuntu repositories, so we need to add the Jenkins repository and install it.
sudo wget -O /usr/share/keyrings/jenkins-keyring.asc \
  https://pkg.jenkins.io/debian-stable/jenkins.io-2023.key
echo deb [signed-by=/usr/share/keyrings/jenkins-keyring.asc] \
  https://pkg.jenkins.io/debian-stable binary/ | sudo tee \
  /etc/apt/sources.list.d/jenkins.list > /dev/null
sudo apt-get update
sudo apt-get install jenkins
Start the Jenkins service:
sudo systemctl start jenkins
Enable Jenkins to start on boot:
sudo systemctl enable jenkins
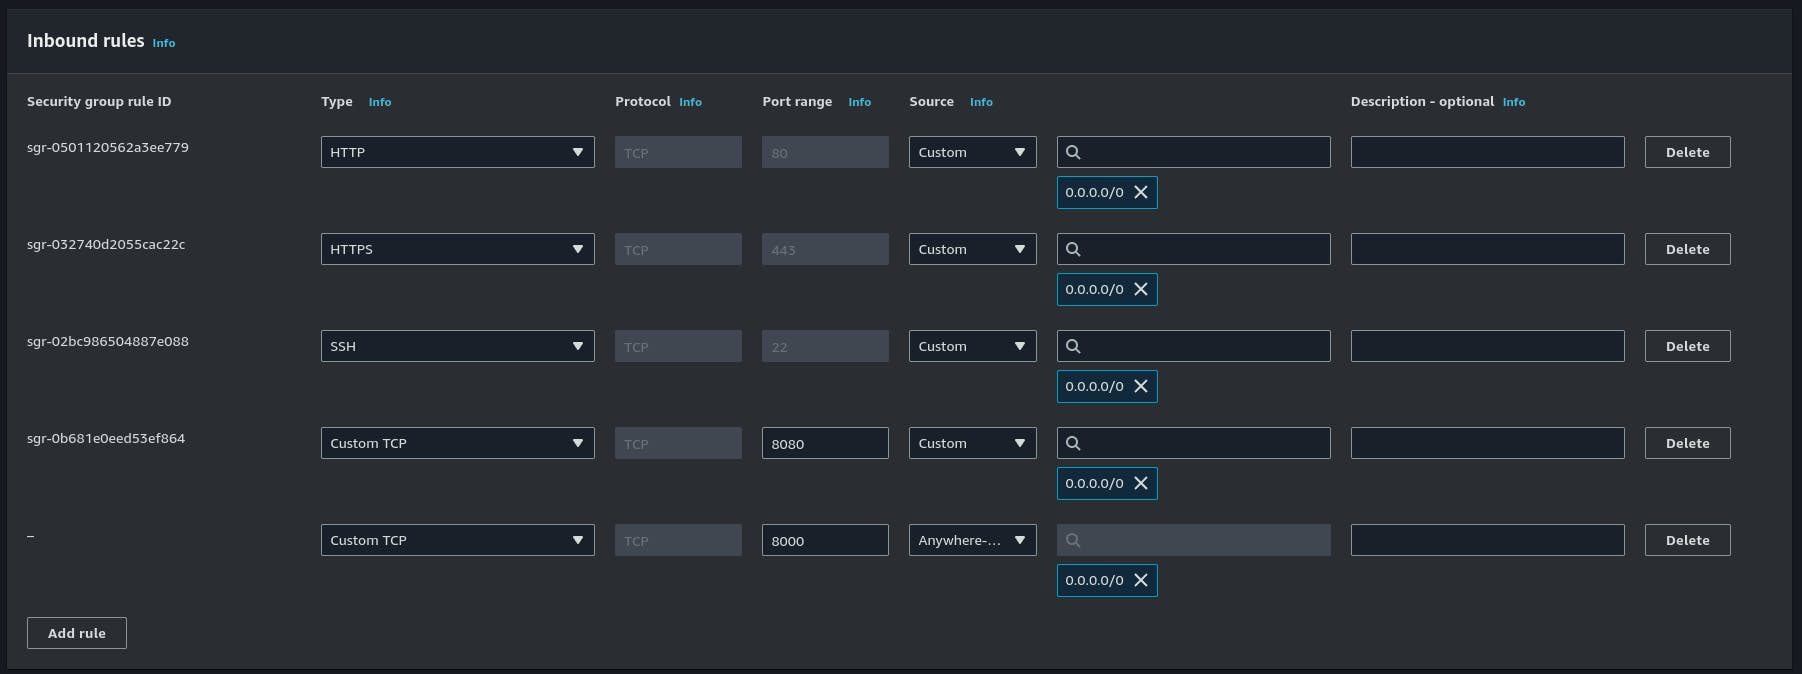
Step 3: Enable port in Security group:
By default, Port 8080 and 8000 is not enabled in your instance security group, you have to select the instance, go to the Security tab -> Click on the Security group and then click Edit Inbound rules. Add ports 8080 and 8000 to the list with Anywhere IPv4 like shown below:
Step 4: Access Jenkins Web Interface:
Jenkins runs on port 8080 by default. Open your web browser and navigate to http://<Your-Public-Ip-address>:8080. You will be prompted to unlock Jenkins, and the initial password can be found in the Jenkins server logs.
sudo cat /var/lib/jenkins/secrets/initialAdminPassword
You can also see the password from:
sudo systemctl status jenkins

Follow the on-screen instructions to complete the setup. Install suggested plugins or customize your plugin selection based on your requirements.
Step 5: Create Jenkins Admin User:
After plugin installation, create an admin user for Jenkins.
💡 Creating a Pipeline:
Before creating Pipeline, we need to install docker and docker-compose and clone the project in the Ubuntu system:
git clone  https://github.com/Pravesh-Sudha/django-notes-app.git
sudo apt install docker.io -y
sudo apt install docker-compose -y

# To avoid permission denied errors in docker,
# Run the following command after installing docker to grant permission:
sudo usermod -aG docker $USER
sudo usermod -aG docker jenkins
sudo reboot
# This will reboot the system and disconnet your terminal
# You can use the ssh command to reconnect it after a few minutes.
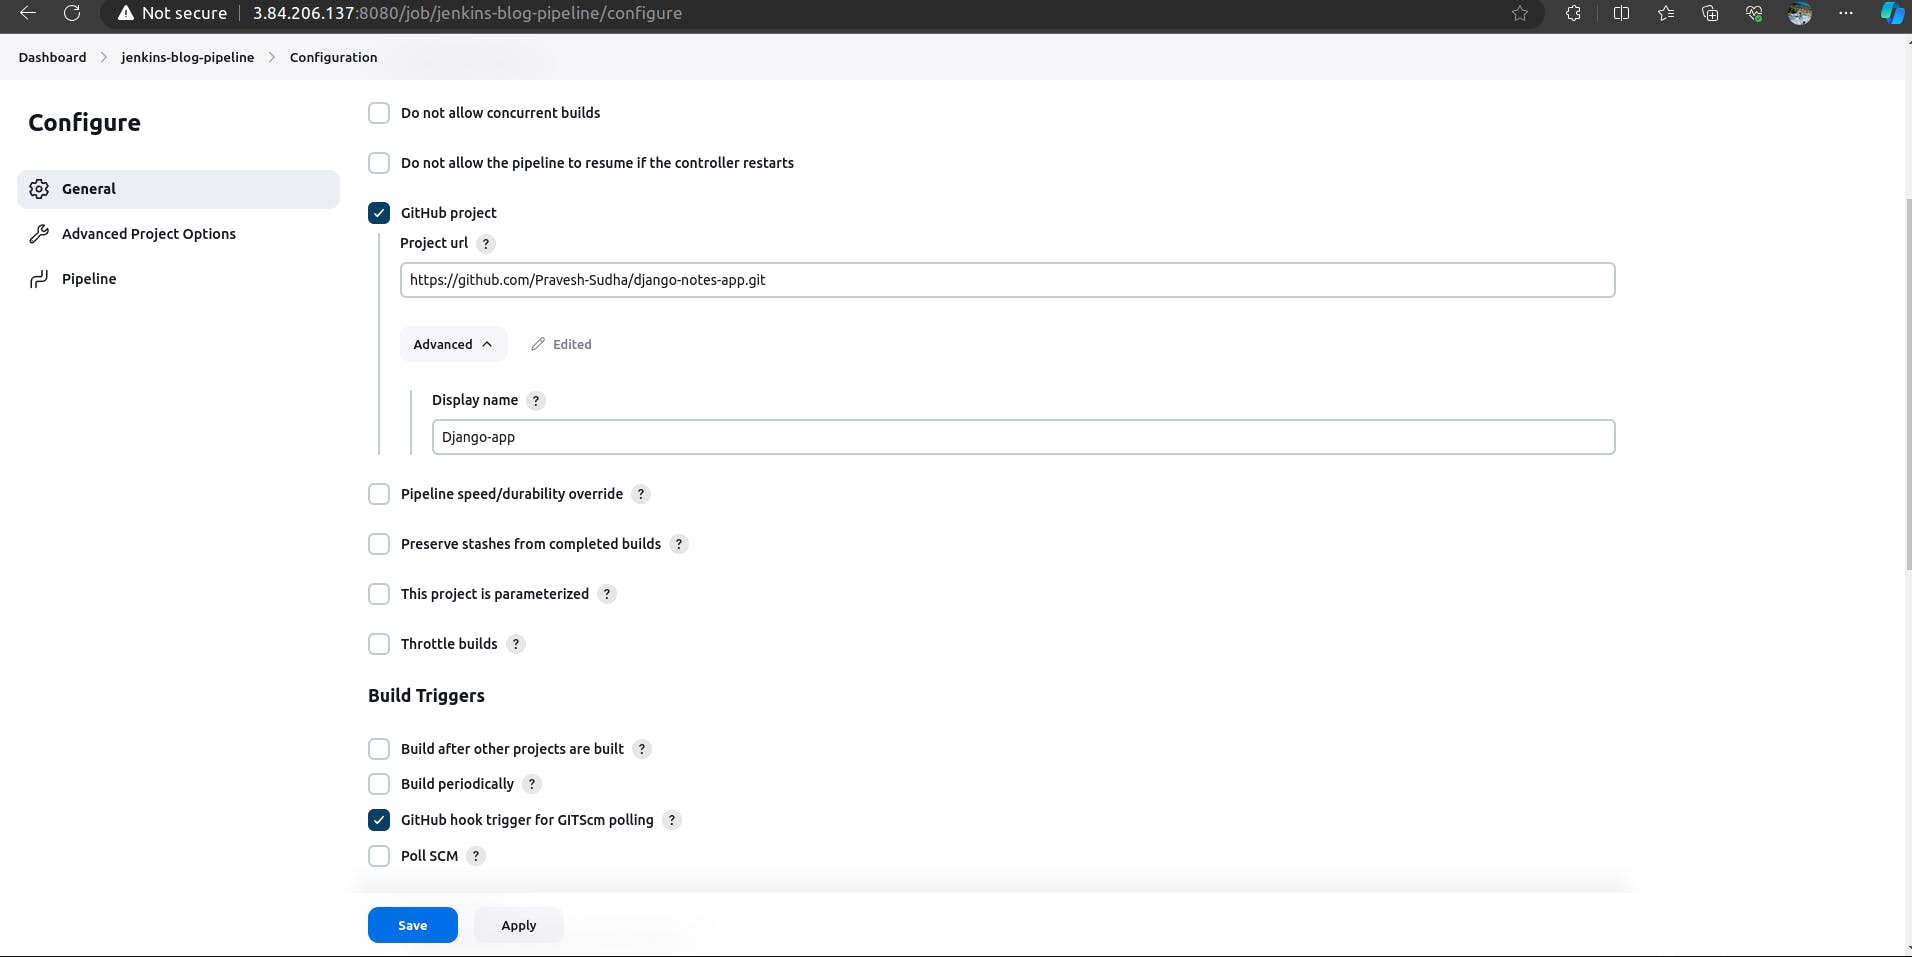
Go to New Item -> Give a name to pipeline (eg Jenkins-blog pipeline) and select Pipeline Project.
Fill in the Details in the General tab as Follows:
like Github project: https://github.com/Pravesh-Sudha/django-notes-app.git
and tick mark the GitHub book trigger in Build triggers
Scroll down to the pipeline section, Write the following pipeline Configuration:
 pipeline {
     agent any

     stages{
         stage("Clone Code"){
             steps {
                 echo "Cloning the code"
                 git url:"https://github.com/Pravesh-Sudha/django-notes-app.git", branch: "main"
             }
         }
         stage("Build"){
             steps {
                 echo "Building the image"
                 sh "docker build -t my-note-app ."
             }
         }
         stage("Push to Docker Hub"){
             steps {
                 echo "Pushing the image to docker hub"
                 withCredentials([usernamePassword(credentialsId:"dockerHub",passwordVariable:"dockerHubPass",usernameVariable:"dockerHubUser")]){
                 sh "docker tag my-note-app ${env.dockerHubUser}/my-note-app:latest"
                 sh "docker login -u ${env.dockerHubUser} -p ${env.dockerHubPass}"
                 sh "docker push ${env.dockerHubUser}/my-note-app:latest"
                 }
             }
         }
         stage("Deploy"){
             steps {
                 echo "Deploying the container"
                 sh "docker-compose down && docker-compose up -d"

             }
         }
     }
 }
This Jenkinsfile represents a declarative pipeline in Jenkins, which defines a series of stages to automate the process of building, packaging, and deploying a Dockerized Django notes app. Let's break down the different sections of this Jenkinsfile:
1. Pipeline Declaration:
pipeline { agent anypipeline: Declares the start of a Jenkins pipeline.agent any: Specifies that the pipeline can run on any available agent (Jenkins worker node).
2. Stages Section:
        stages {
            // Stages go here
        }
stages: Defines a block where different stages of the pipeline are declared.
3. Clone Code Stage:
        stage("Clone Code") {
            steps {
                echo "Cloning the code"
                git url: "https://github.com/Pravesh-Sudha/django-notes-app.git", branch: "main"
            }
        }
stage("Clone Code"): Declares a stage named "Clone Code."steps: Defines a block containing the steps to be executed within this stage.echo "Cloning the code": Prints a message to the console.git url: "https://github.com/LondheShubham153/django-notes-app.git", branch: "main": Clones the specified Git repository from the given URL and branch.
4. Build Stage:
        stage("Build") {
            steps {
                echo "Building the image"
                sh "docker build -t my-note-app ."
            }
        }
stage("Build"): Declares a stage named "Build."steps: Defines a block containing the steps to be executed within this stage.echo "Building the image": Prints a message to the console.sh "docker build -t my-note-app .": Executes a shell command to build a Docker image named "my-note-app."
5. Push to Docker Hub Stage:
        stage("Push to Docker Hub") {
            steps {
                echo "Pushing the image to Docker Hub"
                withCredentials([usernamePassword(credentialsId:"dockerHub",passwordVariable:"dockerHubPass",usernameVariable:"dockerHubUser")]){
                    sh "docker tag my-note-app ${env.dockerHubUser}/my-note-app:latest"
                    sh "docker login -u ${env.dockerHubUser} -p ${env.dockerHubPass}"
                    sh "docker push ${env.dockerHubUser}/my-note-app:latest"
                }
            }
        }
stage("Push to Docker Hub"): Declares a stage named "Push to Docker Hub."steps: Defines a block containing the steps to be executed within this stage.echo "Pushing the image to Docker Hub": Prints a message to the console.withCredentials: Allows the use of credentials stored in Jenkins for authentication.sh "docker tag my-note-app ${env.dockerHubUser}/my-note-app:latest": Tags the Docker image with the appropriate repository and tag.sh "docker login -u ${env.dockerHubUser} -p ${env.dockerHubPass}": Logs in to Docker Hub using the provided credentials.sh "docker push ${env.dockerHubUser}/my-note-app:latest": Pushes the Docker image to Docker Hub.
6. Deploy Stage:
        stage("Deploy") {
            steps {
                echo "Deploying the container"
                sh "docker-compose down && docker-compose up -d"
            }
        }
stage("Deploy"): Declares a stage named "Deploy."steps: Defines a block containing the steps to be executed within this stage.echo "Deploying the container": Prints a message to the console.sh "docker-compose down && docker-compose up -d": Stops and removes existing Docker containers usingdocker-compose downand then start the application in detached mode (-d) usingdocker-compose up.
Before running the Pipeline, we need to add the environment variable of docker hub credentials as Specified in the Push to Docker Hub Stage:
Go To Dashboard -> Manage Jenkins -> Credentials. Click System Credentials -> Global credentials -> Add credentials.
Select Username and Password in the drop-down menu. Enter your Dockerhub username and password and fill in the ID section with dockerHub.
Click save and apply to apply the change.
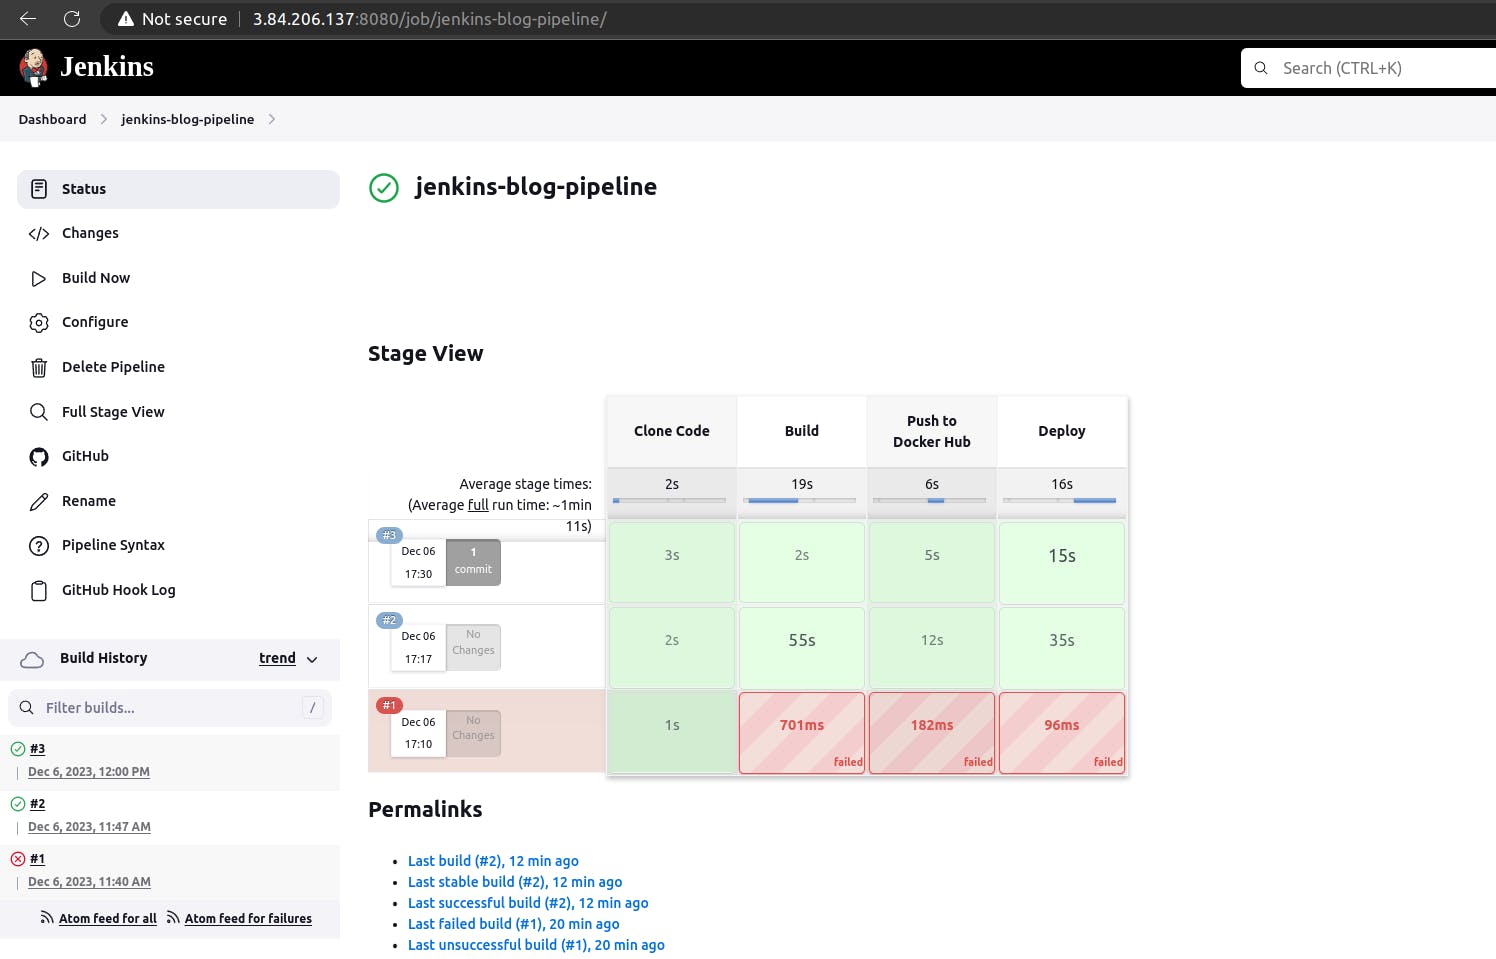
💡Running the Pipeline
Go to the Pipeline project -> Click Build now. You will see an output like this:
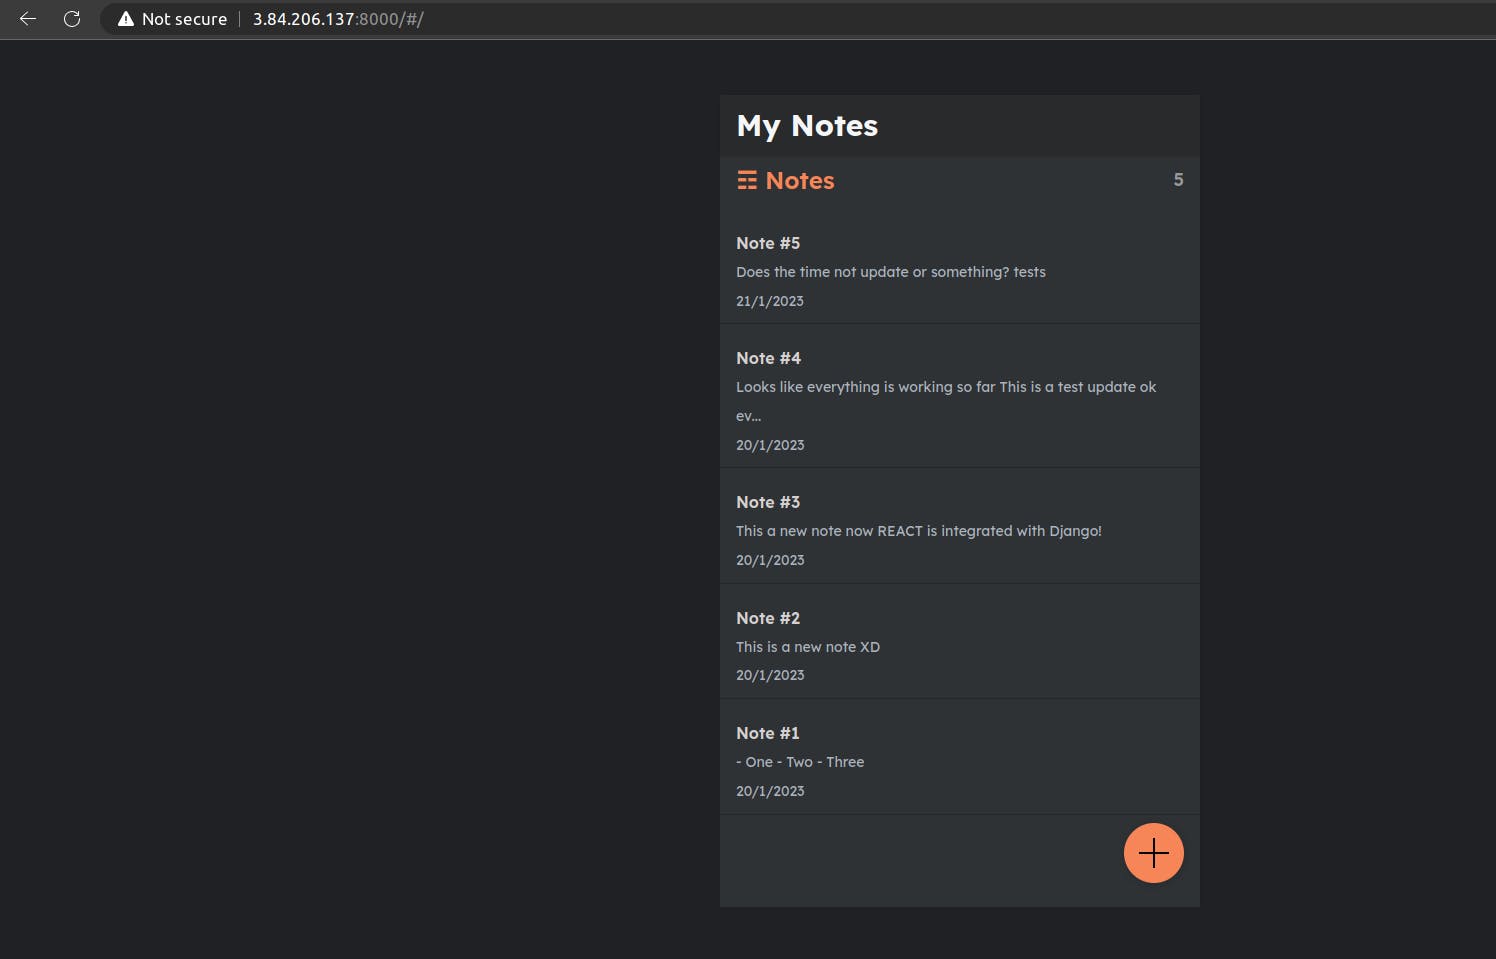
Your application docker container will also be running at http://your-ip-addresss:8000. A sample of the application looks like this:
💡 Auto-Building the Project
If you want this project to build whenever there is a push commit to the repo go to project settings.
- Select Webhook -> Add Webhooks.
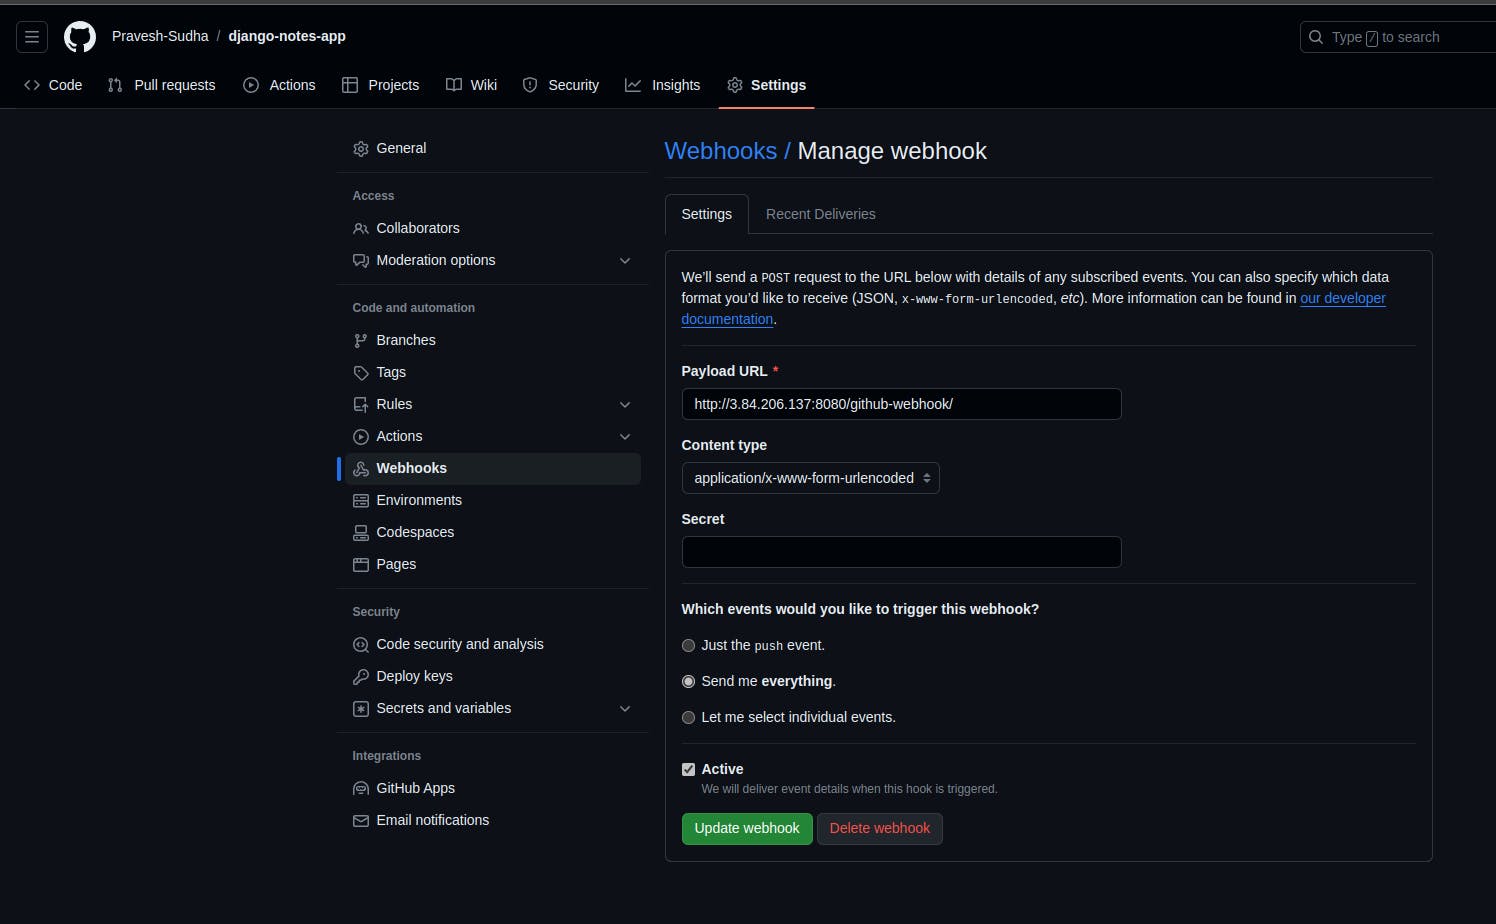
In the payload URL, add
http://<your-ip-address>:8080/github-webhookSelect Send me everything, to get notified about every build.
Make a commit to the repo and see the auto build working.
💡 Conclusion
In wrapping up our journey, you've mastered the basics of Jenkins Declarative CI/CD pipelines and successfully deployed a Django Notes App on an AWS EC2 instance. We covered everything from setting up Jenkins to connecting via SSH and witnessed the automation magic in action.
This hands-on experience is your launchpad into the world of DevOps. Armed with the ability to automate builds, tests, and deployments, you're now well-equipped for the dynamic realm of continuous improvement.
As you venture forward, remember that DevOps is a journey of continual learning. Use this foundation to explore advanced topics, refine your workflows, and stay ahead in the ever-evolving landscape of DevOps. Happy automating, and welcome to the world of DevOps excellence!
Happy Coding!! :)