

💡 Introduction
Welcome to the immersive journey of cloud-native development in my latest blog series, where we will unravel the intricacies of deploying a Python monitoring application on Kubernetes. From crafting the application using Flask to orchestrating it with Kubernetes on Amazon EKS, we guide you step-by-step through the entire process. Learn the art of building a Dockerfile, creating a Docker image, and seamlessly pushing it to Amazon ECR using boto3. The climax of this adventure? Deploying our cloud-native masterpiece onto Amazon EKS, where scalability and flexibility converge.
💡 Pre-Requisites
AWS Account: Ensure you have an active AWS account to leverage services like Amazon EKS and ECR.
AWS CLI and Credentials: Install the AWS Command Line Interface (CLI) and configure it with the necessary credentials to interact with your AWS resources.
Docker Installation: Have Docker installed on your local development environment to containerize the Python application. This ensures consistency across different environments.
Kubernetes Tools: Install kubectl, the Kubernetes command-line tool, to interact with your Kubernetes clusters.
Python3 and Flask: Ensure you have Python3 installed on your system. Familiarize yourself with Flask, as we'll be building the monitoring application using this lightweight web framework.
💡 Creating the Project
Create a folder name Cloud-native-monitoring-app. Open that folder in VS Code or any other code editor.
In that folder, create a file name app.py and add the following content:
import psutil

from flask import Flask, render_template

app = Flask(__name__)


@app.route("/")
def index():
    cpu_percent = psutil.cpu_percent()
    mem_percent = psutil.virtual_memory().percent
    Message = None
    if cpu_percent > 80 or mem_percent > 80:
        Message = "High CPU Utilization or memory utilization deteched. Please Scale UP!!"

    return render_template("index.html", cpu_metric=cpu_percent, mem_metric=mem_percent,message=Message)


if __name__ == "__main__":
    app.run(debug=True, host="0.0.0.0")
- In that project folder, create a file named index.html under a templates folder with the following content:
<!DOCTYPE html>
<html>
<head>
    <title>System Monitoring</title>
    <script src="https://cdn.plot.ly/plotly-latest.min.js"></script>
    <style>
        .plotly-graph-div {
            margin: auto;
            width: 50%;
            background-color: rgba(151, 128, 128, 0.688);
            padding: 20px;
        }
    </style>
</head>
<body>
    <div class="container">
        <h1>System Monitoring</h1>
        <div id="cpu-gauge"></div>
        <div id="mem-gauge"></div>
        {% if message %}
        <div class="alert alert-danger">{{ message }}</div>
        {% endif %}
    </div>
    <script>
        var cpuGauge = {
            type: "indicator",
            mode: "gauge+number",
            value: {{ cpu_metric }},
            gauge: {
                axis: { range: [null, 100] },
                bar: { color: "#1f77b4" },
                bgcolor: "white",
                borderwidth: 2,
                bordercolor: "#ccc",
                steps: [
                    { range: [0, 50], color: "#d9f0a3" },
                    { range: [50, 85], color: "#ffeb84" },
                    { range: [85, 100], color: "#ff5f5f" }
                ],
                threshold: {
                    line: { color: "red", width: 4 },
                    thickness: 0.75,
                    value: {{ cpu_metric }}
                }
            }
        };

        var memGauge = {
            type: "indicator",
            mode: "gauge+number",
            value: {{ mem_metric }},
            gauge: {
                axis: { range: [null, 100] },
                bar: { color: "#1f77b4" },
                bgcolor: "white",
                borderwidth: 2,
                bordercolor: "#ccc",
                steps: [
                    { range: [0, 50], color: "#d9f0a3" },
                    { range: [50, 85], color: "#ffeb84" },
                    { range: [85, 100], color: "#ff5f5f" }
                ],
                threshold: {
                    line: { color: "red", width: 4 },
                    thickness: 0.75,
                    value: {{ mem_metric }}
                }
            }
        };

        var cpuGaugeLayout = { title: "CPU Utilization" };
        var memGaugeLayout = { title: "Memory Utilization" };

        Plotly.newPlot('cpu-gauge', [cpuGauge], cpuGaugeLayout);
        Plotly.newPlot('mem-gauge', [memGauge], memGaugeLayout);
    </script>
</body>
</html>
- Before testing the Application, ensure you have installed the necessary modules to run it by creating a file named requirements.txt:
Flask==2.2.3
MarkupSafe==2.1.2
Werkzeug==2.2.3
itsdangerous==2.1.2
psutil==5.8.0
plotly==5.5.0
tenacity==8.0.1
boto3==1.9.148
kubernetes==10.0.1
- Run the following command to install the dependencies:
pip3 install -r requirements.txt
- After installing the dependencies, you are good to test the project in your local machine by using the following command:
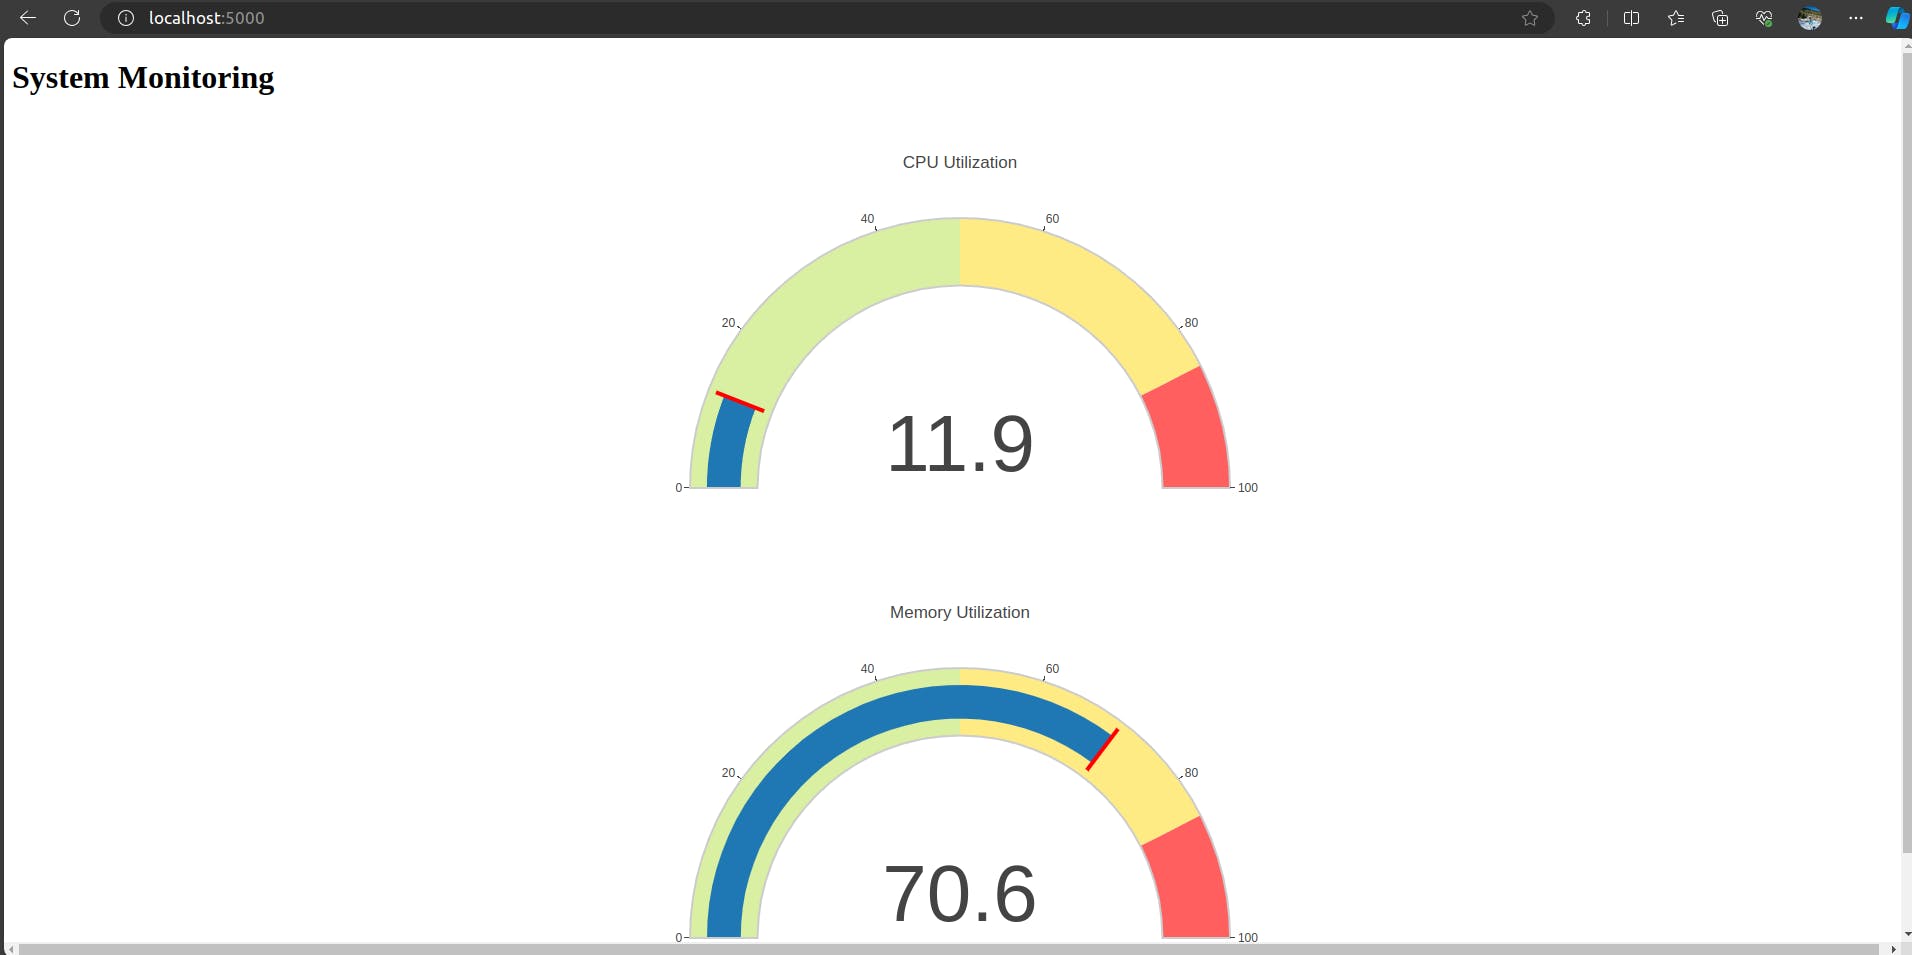
python3 app.py
You can see the App running on your localhost:5000 like one below:
💡 Dockerizing the Application
After seeing that Our application is running fine in your local machine, let's make a Dockerfile for the project:
In the project Directory, create a file named Dockerfile and put the following content in it:
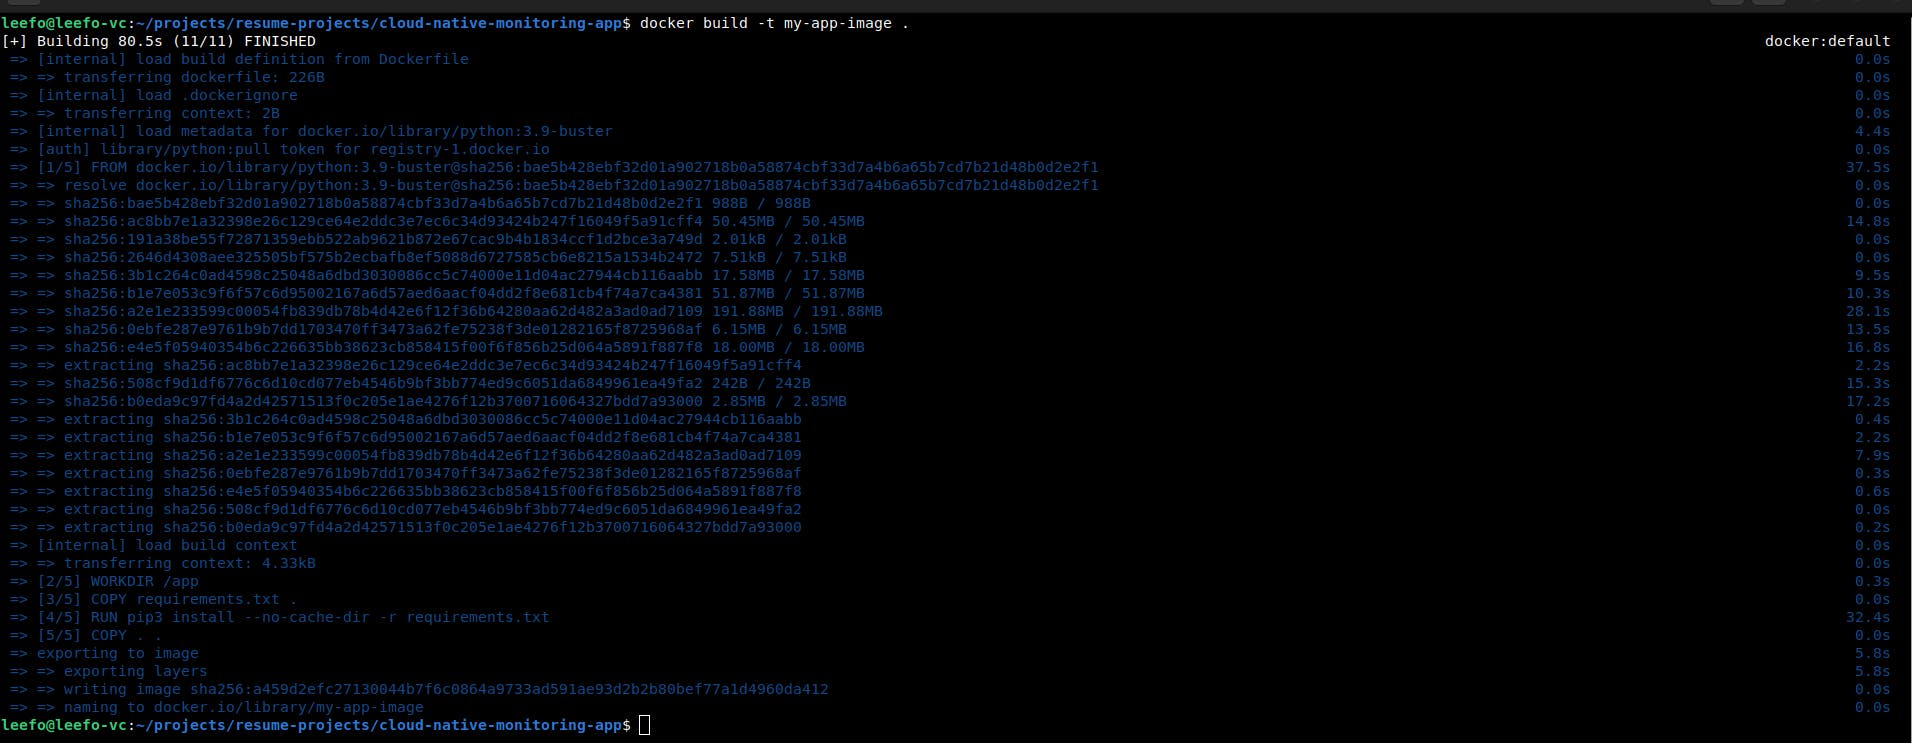
 FROM python:3.9-buster

 WORKDIR /app

 COPY requirements.txt .

 RUN pip3 install --no-cache-dir -r requirements.txt

 COPY . .

 ENV FLASK_RUN_HOST=0.0.0.0

 EXPOSE 5000

 CMD ["flask", "run"]
After creating the file, run the following command to make a docker image from the dockerfile:
docker build -t my-app-image .It will show some Output like this:
After having the image, run a docker container out of it using the following command:
docker run -d -p 5000:5000 my-app-image
You can Check the status of your container using the following command:
docker ps
It will show something like this:
💡 Creating ECR using boto3
After creating the docker image for the project, we need to deploy the image to a platform where we can keep it safe, generally we can use dockerhub for this but in this blog, we will create an ECR using boto3 and deploy the docker image in it.
In the project directory, create a new file named ecr.py and add the following content in it:
 import boto3

 client = boto3.client('ecr')

 repo_name = "cloud-native-monitoring-app"

 response = client.create_repository(
     repositoryName=repo_name
 )

 repository_uri = response['repository']['repositoryUri']
 print(repository_uri)
Run the following command to create ECR in your AWS account:
python3 ecr.pyThis will create a ECR repository in your configured AWS account which you can check using the following command:
aws ecr describe-repositoriesAfter creating the repo, Go to your AWS Management Console and navigate to ECR to see your repo. Click on cloud-native-monitoring-app and you can see a button named view push commands. Click on that button which will open a prompt which will have the following command:
 aws ecr get-login-password --region us-east-1 | docker login --username AWS --password-stdin <Your-account-details>

 docker build -t cloud-native-monitoring-app .

 docker tag cloud-native-monitoring-app:latest <Your-account-details>/cloud-native-monitoring-app:latest

 docker push <Your-account-details>/cloud-native-monitoring-app:latest
Make sure to replace <Your-account-details> with your actual details which can be seen in the prompt of view push commands.
Follow the above commands in order and your docker image will be pushed to the respective ECR repository.
💡 Creating a EKS Cluster
After pushing the docker image to ECR registry, we are good to go for creating a Kubernetes cluster in AWS EKS. Follow the following steps to create a EKS cluster on which we will host our Cloud-native-monitoring-application:
Go to the Search tab, type EKS and select Elastic Kubernetes services. It will open a new tab.
Select add Cluster and in the drop-down menu, click on Create. It will open the following page, add the details like Cluster name (cloud-native-cluster):
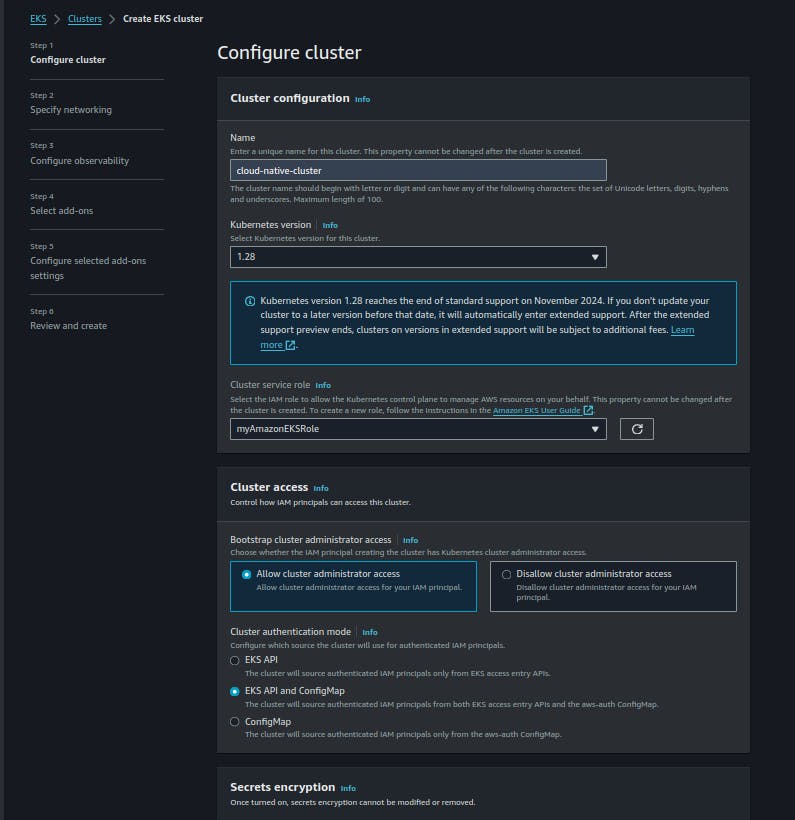
In the above image, you can see Cluster service role is set to myAmazonEKSRole, in your case, it will show noting. To create a role, search for IAM in the search tab and navigate to Roles tab.
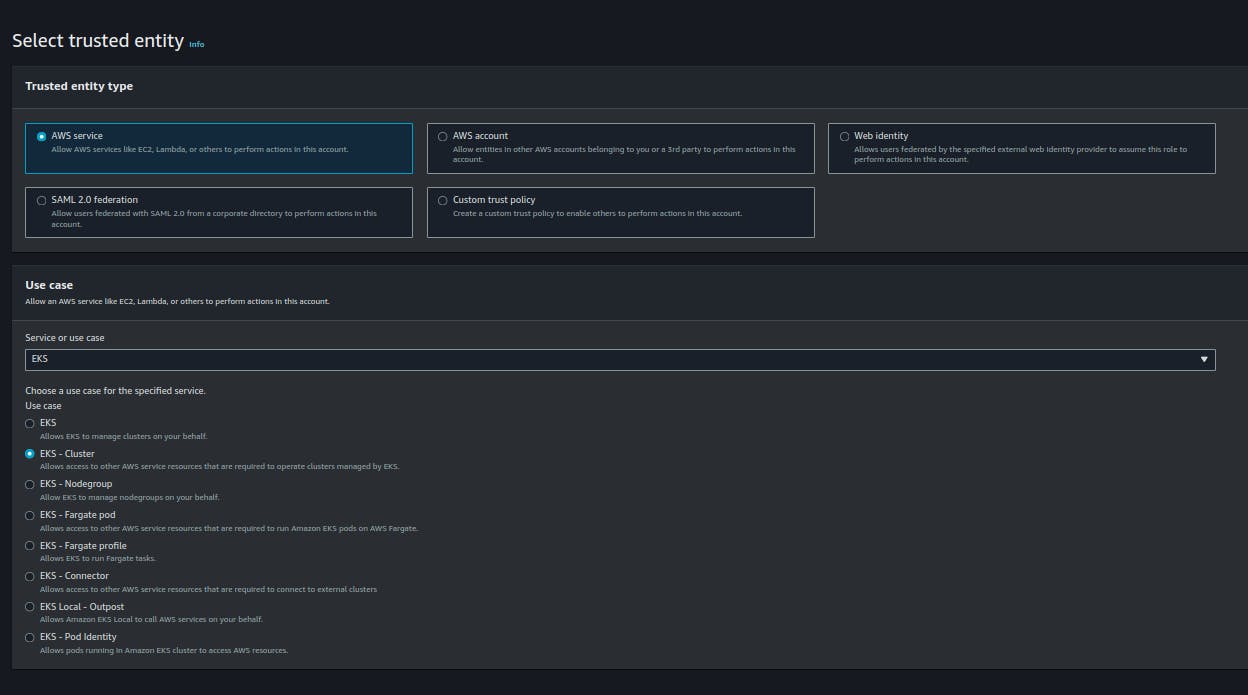
In the Roles tab, Click on Create role and Select AWS services in the Trusted Entity type and Select EKS in service type, under use case, go for EKS-Cluster to create a custom policy like specified below:
After that click on next and give it a name (eg: myAmazonEKSRole) and go back to EKS page.
Now if you refresh the role drop down menu, you can see the role created by you. Select the role and keep the rest as default and click next.
In Specifying Networking settings, select your default VPC, subnets and security groups, make sure to remove any private subnets which you created and ensure that the security group you selected have port 5000 open.
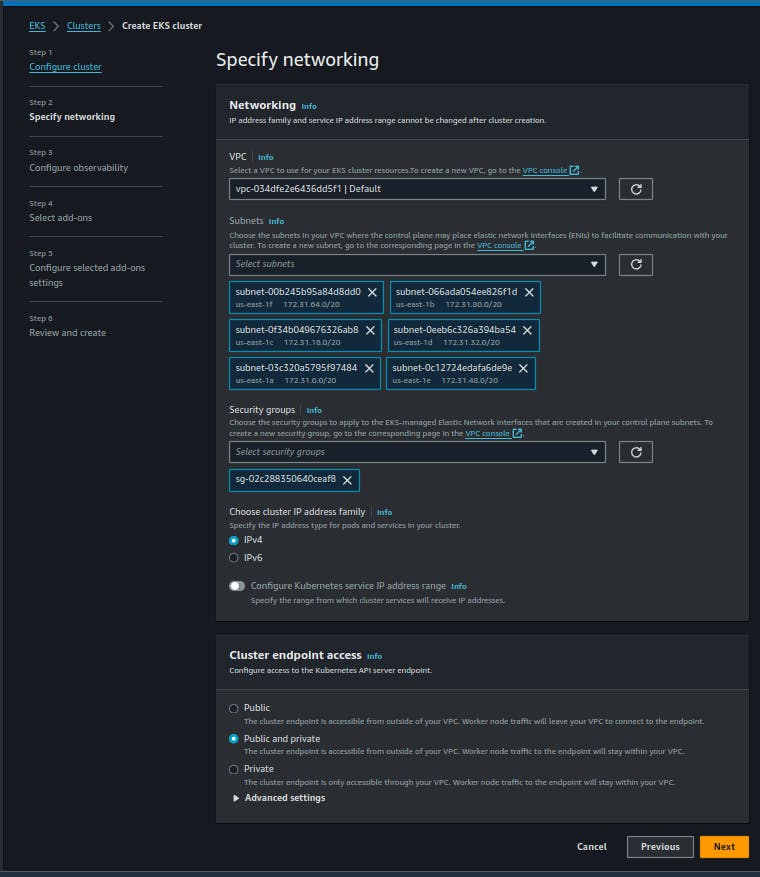
After then leave the rest of the configurations as default and Review and create the Cluster.
The cluster will take up to 10-15 mins for creation. After the cluster is fully created, we will create Node group for our nodes.
💡 Creating Node Groups
- Once the Cluster state is active, we will go to compute tab under our cloud-native-cluster and in the Node group section, Click on Add Node Group. It will Give you the following prompt in (enter details like node group and IAM role for the node).
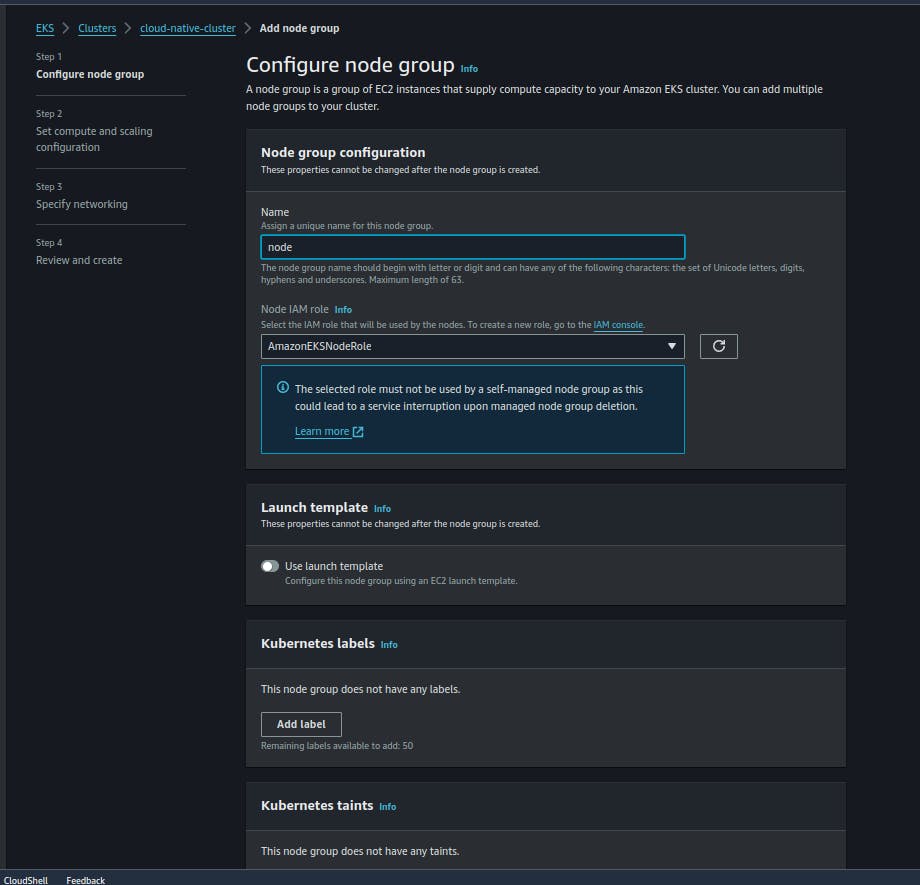
- In the above Image, you can see a Node IAM Role, just like before, you need to create an Eks role with the following permissions attached:
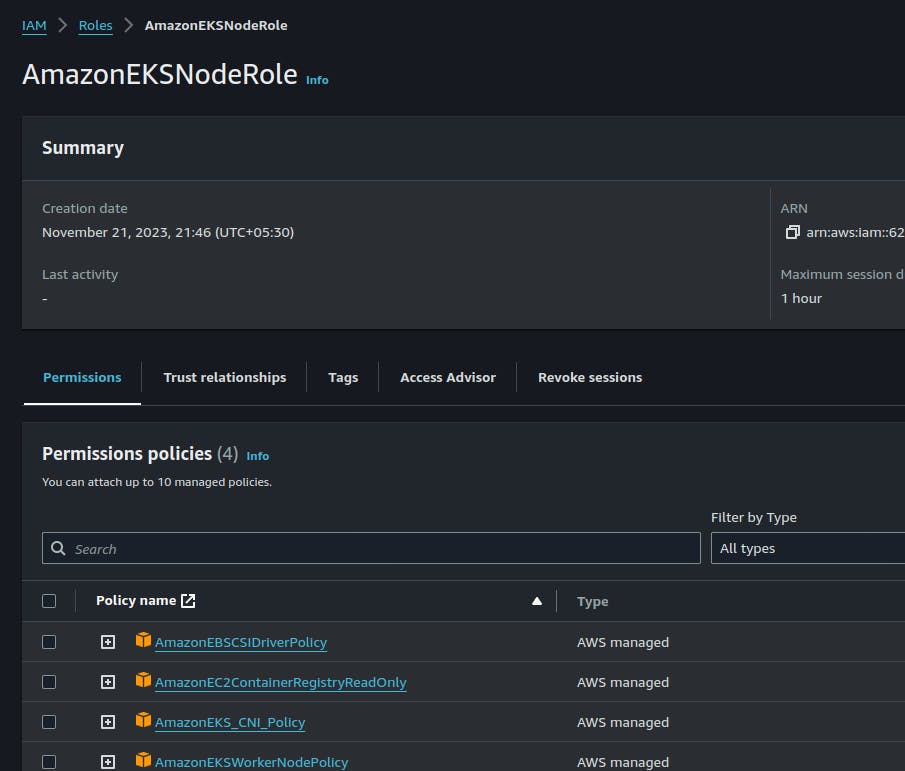
- Remember to change the trusted relationship in the above image with the following Json, otherwise your role will not show up:
{
    "Version": "2012-10-17",
    "Statement": [
        {
            "Effect": "Allow",
            "Principal": {
                "Service": "ec2.amazonaws.com"
            },
            "Action": "sts:AssumeRole",
            "Condition": {}
        }
    ]
}
After creating the role, refresh the drop-down menu and select your role. Leave the rest and default and click on Next.
In Set compute and scaling configuration, select t2.micro as instance type and leave the rest as default.
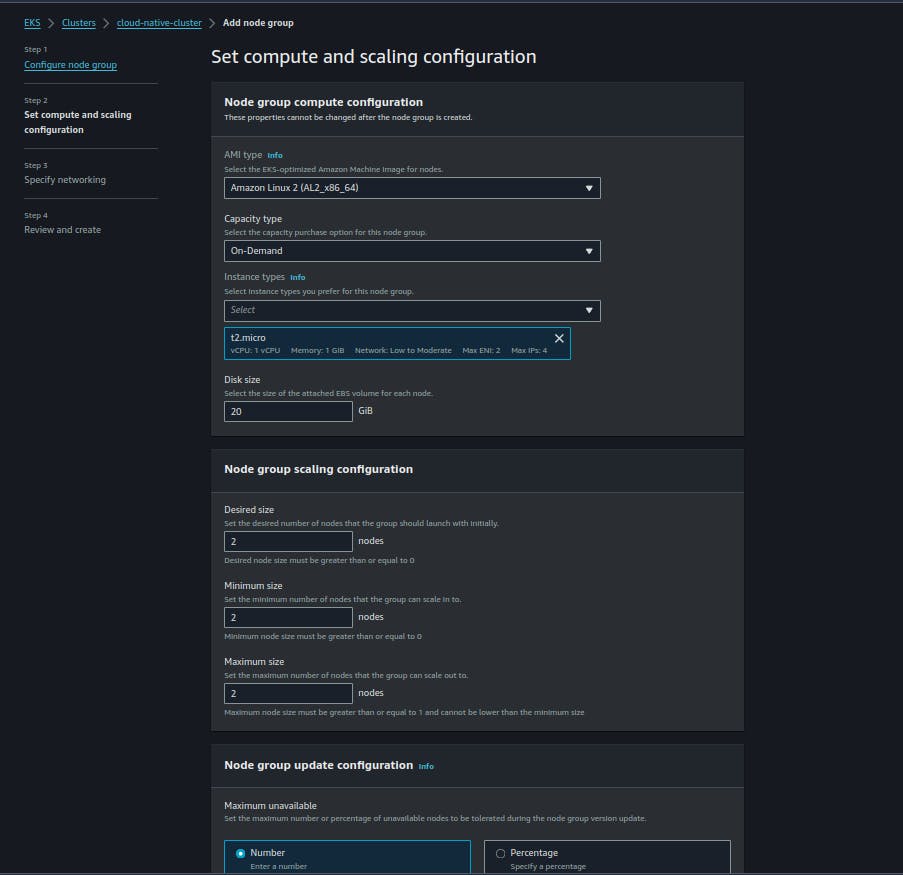
Click on next, leave the default configuration as is it and Click on create the node group.
💡 Creating Kubernetes Deployments and Services
After initializing node group and cluster, we need to write the deployment and service file for the project to be deployed on cloud-native-cluster. Follow the next steps to create the yaml files:
In the project directory, create a file named eks.py and put the following content in it:
 #create deployment and service
 from kubernetes import client, config

 # Load Kubernetes configuration
 config.load_kube_config()

 # Create a Kubernetes API client
 api_client = client.ApiClient()

 # Define the deployment
 deployment = client.V1Deployment(
     metadata=client.V1ObjectMeta(name="my-flask-app"),
     spec=client.V1DeploymentSpec(
         replicas=1,
         selector=client.V1LabelSelector(
             match_labels={"app": "my-flask-app"}
         ),
         template=client.V1PodTemplateSpec(
             metadata=client.V1ObjectMeta(
                 labels={"app": "my-flask-app"}
             ),
             spec=client.V1PodSpec(
                 containers=[
                     client.V1Container(
                         name="my-flask-container",
                         image="<Your-Image-URI>",
                         ports=[client.V1ContainerPort(container_port=5000)]
                     )
                 ]
             )
         )
     )
 )

 # Create the deployment
 api_instance = client.AppsV1Api(api_client)
 api_instance.create_namespaced_deployment(
     namespace="default",
     body=deployment
 )

 # Define the service
 service = client.V1Service(
     metadata=client.V1ObjectMeta(name="my-flask-service"),
     spec=client.V1ServiceSpec(
         selector={"app": "my-flask-app"},
         ports=[client.V1ServicePort(port=5000)]
     )
 )

 # Create the service
 api_instance = client.CoreV1Api(api_client)
 api_instance.create_namespaced_service(
     namespace="default",
     body=service
 )
In the above code, make sure to replace <Your-Image-URI> with the actual URI of the docker image you pushed on the ECR registry.
After creating that Open terminal and run the following command to connect your kubectl with the cloud-native-cluster:
aws eks update-kubeconfig --name cloud-native-clusterTo apply the deployment and services, we created in the eks.py, run the file with the following command:
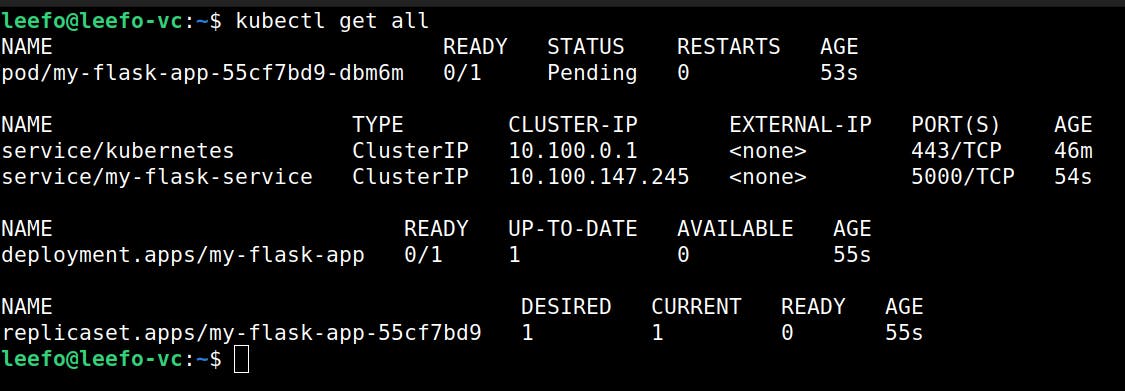
python3 eks.pyAfter running the file, You can see the pods, deployments and services running into your cluster with the following command:
kubectl get all
It will give the following output:
To expose the service to the outside world, we need to use the following command:
kubectl port-forward service/my-flask-service 5000:5000
After exposing the service to the outside world, we can go to our localhost:5000 and you can see your application running which is actually running inside a Kubernetes cluster.
💡 Conclusion
In conclusion, this blog journeyed through the seamless creation and deployment of a cloud-native monitoring application. Starting with the development of the application using Flask, we then containerized it by crafting a Docker image. Taking the next step, we securely stored and managed our Docker image in Amazon Elastic Container Registry (ECR). Harnessing the power of Kubernetes, we elevated our deployment strategy by establishing an Amazon EKS cluster. This orchestrated environment efficiently utilizes the Docker image, ensuring our application scales dynamically while maintaining resilience. The end result is a robust, scalable, and highly available monitoring solution, demonstrating the synergy between Flask, Docker, ECR, and EKS in the cloud-native landscape.
Happy Coding!!!