

💡 Introduction
Welcome to an exciting journey into the world of cloud-native app development! In this blog, we're diving into the process of deploying a voting app on Amazon EKS. Imagine a seamless blend of ReactJS for the user-friendly front-end and Go (Golang) as the powerhouse behind the scenes, handling user votes. Our data is securely stored in MongoDB, configured with a replica set for extra reliability. Together, we'll bring this tech ensemble to life on Amazon EKS, where the magic of cloud-native architecture unfolds.
ReactJS creates the app's sleek look, while Go handles the nitty-gritty of user votes. MongoDB ensures our data is safe with a replica set for backup. You will have the code from a Docker Image.
💡 Pre-Requisites
AWS Account: Ensure you have an active AWS account with appropriate permissions for managing EKS clusters, ECR repositories, and other AWS services.
AWS CLI and kubectl: Install and configure the AWS CLI for AWS service interaction and kubectl for Kubernetes cluster management.
Node.js and npm: Install Node.js and npm to facilitate ReactJS application development for the frontend.
MongoDB Atlas Account (Optional): Consider setting up a MongoDB Atlas account for a cloud-based MongoDB instance. Obtain connection details for integrating MongoDB with the voting app.
💡 EKS Setup
Once you are gone through all the pre-requisites, we are good to go. First, we will setup our EKS cluster as it usually takes 15-20 mins to setup. So that, we can alongside do the configuration things, Follow the below steps to create a EKS cluster:
Go to services(search) bar, search EKS and Click on Elastic Kubernetes Services.
Select add Cluster and in the drop-down menu, click on Create. It will open the following page, add the details like Cluster name (cloud-native-cluster):
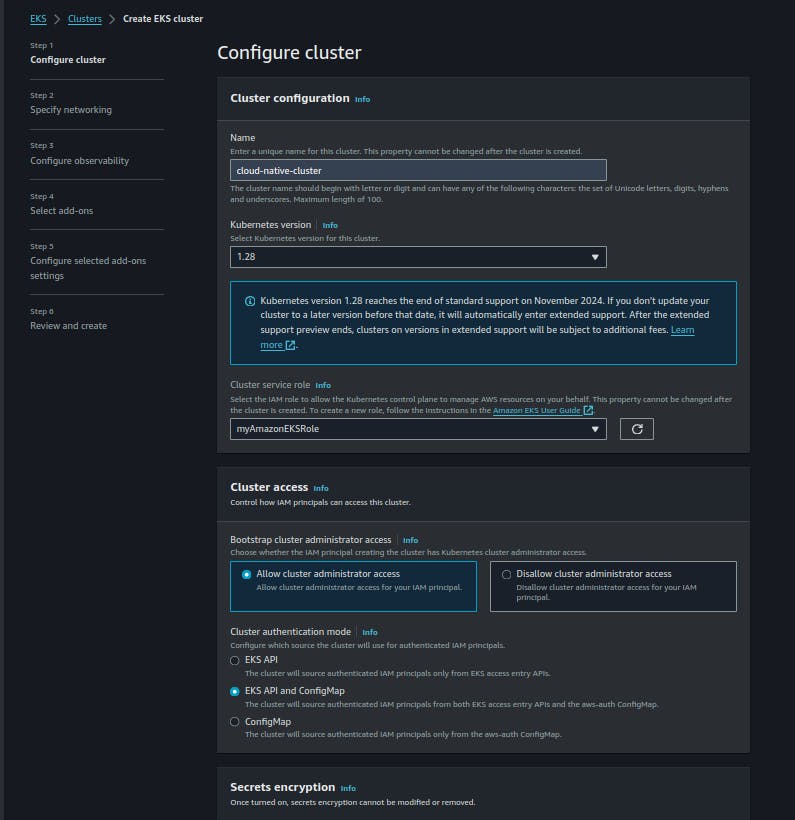
In the above image, you can see Cluster service role is set to myAmazonEKSRole, in your case, it will show noting. To create a role, search for IAM in the search tab and navigate to Roles tab.
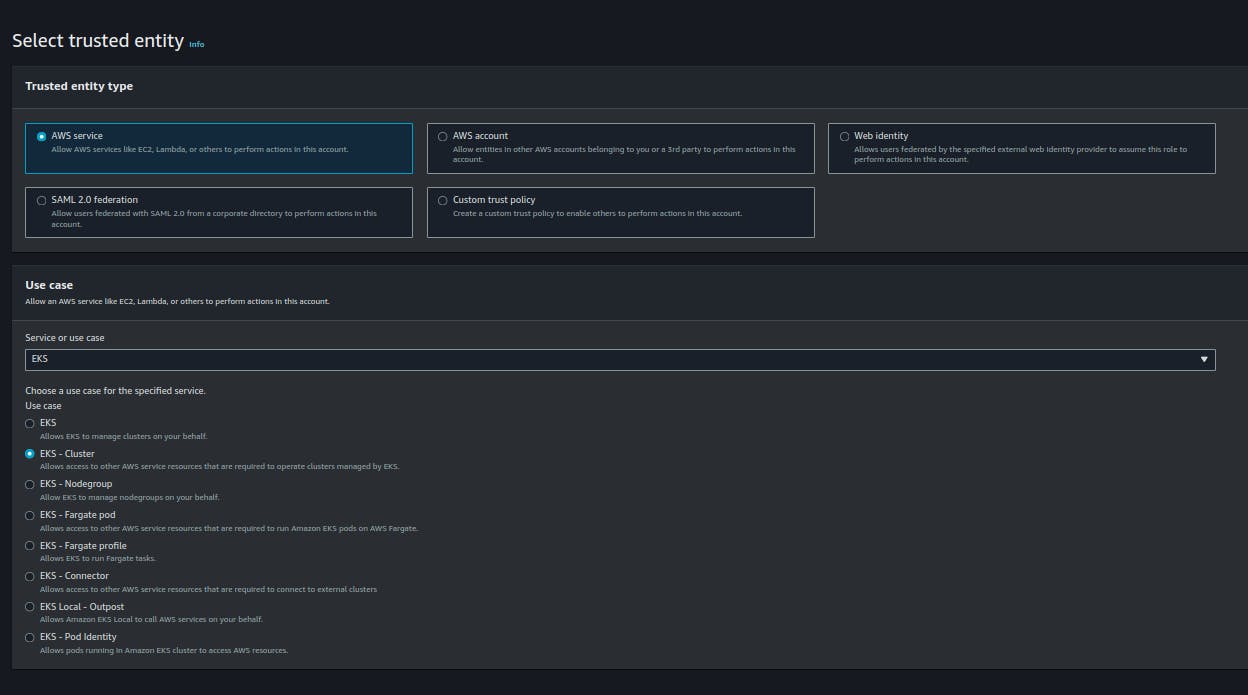
In the Roles tab, Click on Create role and Select AWS services in the Trusted Entity type and Select EKS in service type, under use case, go for EKS-Cluster to create a custom policy like specified below:
After that click on next and give it a name (eg: myAmazonEKSRole) and go back to EKS page.
Now if you refresh the role drop down menu, you can see the role created by you. Select the role and keep the rest as default and click next.
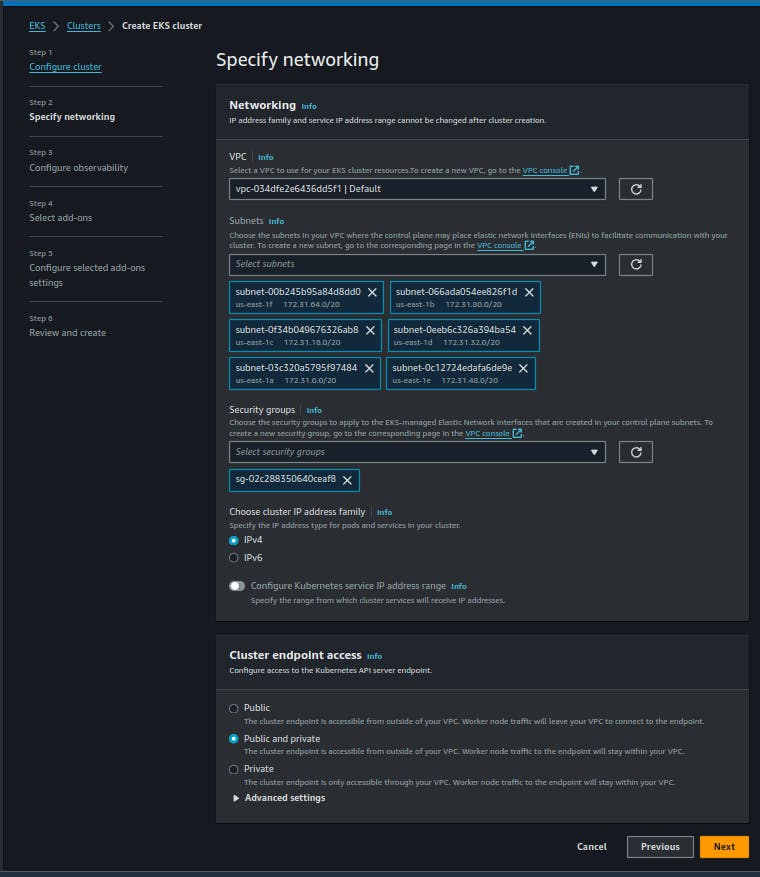
In Specifying Networking settings, select your default VPC, subnets and security groups, make sure to remove any private subnets which you created and ensure that the security group you selected have port 5000 open.
After then leave the rest of the configurations as default and Review and create the Cluster. The cluster will take up to 10-15 mins for creation. After the cluster is fully created, we will add some add-ons for our nodes.
Go to cloud-native-cluster and select Add-ons tab. Click on Get more Add-ons and select Amazon EBS CSI driver. Click on next and leave the rest as default. This is add the EBS CSI driver and after then we will create the node group for our cluster.
💡 Creating Node Group for the Cluster
- Once the Cluster state is active, we will go to compute tab under our cloud-native-cluster and in the Node group section, Click on Add Node Group. It will Give you the following prompt in (enter details like node group and IAM role for the node).
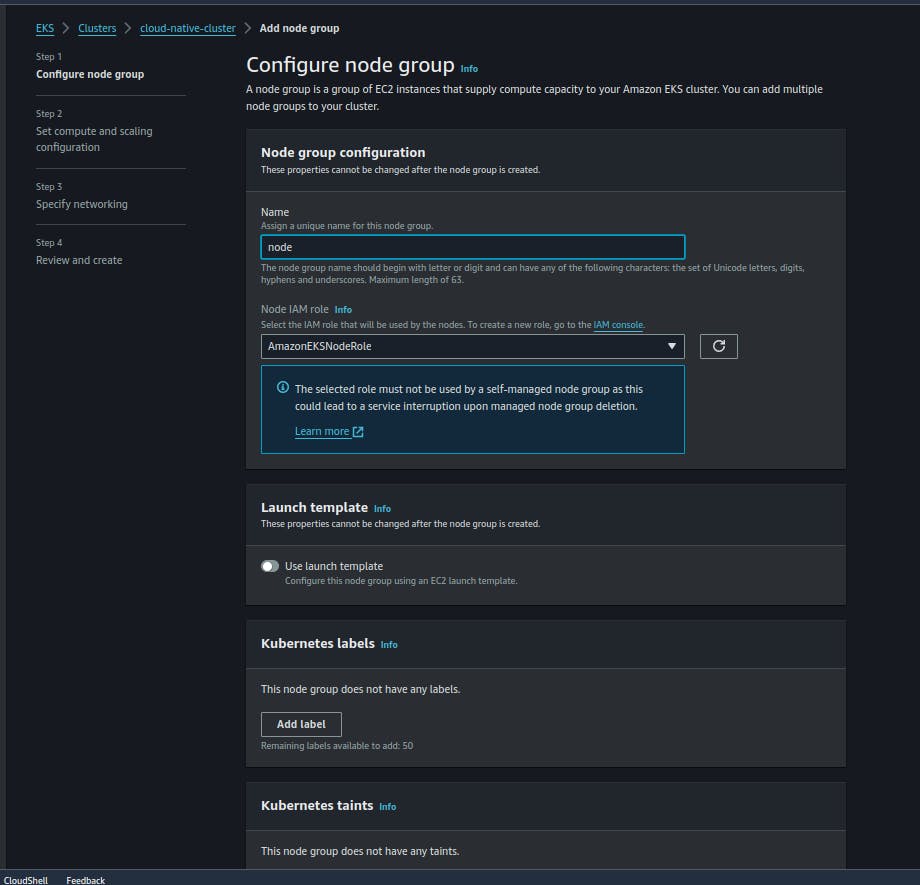
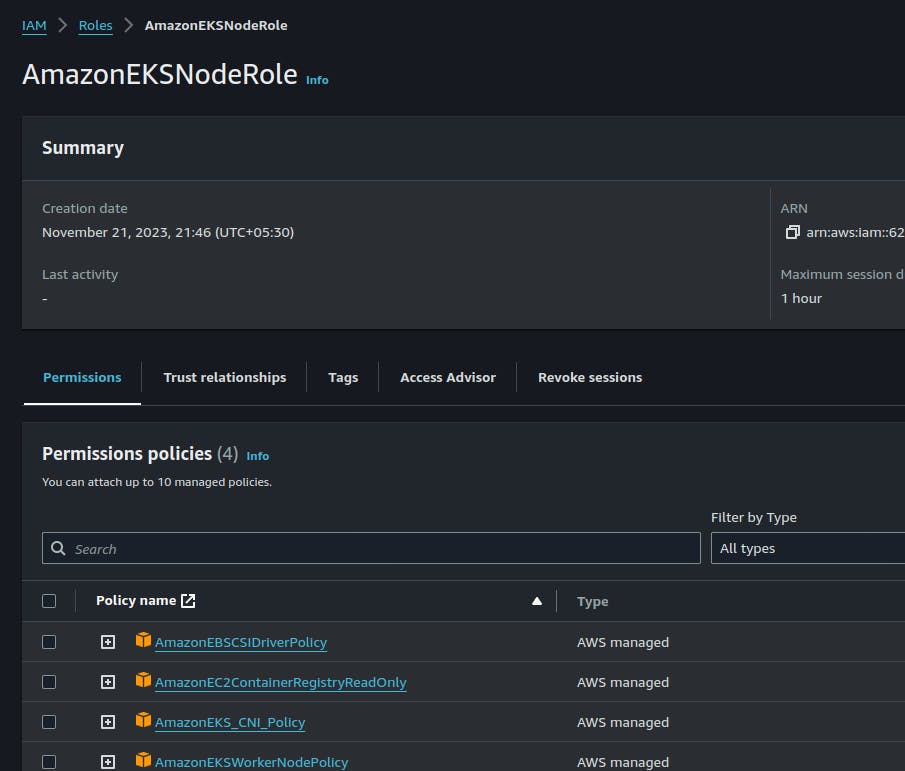
- In the above Image, you can see a Node IAM Role, just like before, you need to create an Eks role with the following permissions attached:
Remember to change the trusted relationship in the above image with the following Json, otherwise your role will not show up:
{
    "Version": "2012-10-17",
    "Statement": [
        {
            "Effect": "Allow",
            "Principal": {
                "Service": "ec2.amazonaws.com"
            },
            "Action": "sts:AssumeRole",
            "Condition": {}
        }
    ]
}
After creating the role, refresh the drop-down menu and select your role. Leave the rest and default and click on Next.
In Set compute and scaling configuration, select t2.medium as instance type and leave the rest as default.

Click on next, leave the default configuration as is it and Click on create the node group.
💡 Configuring the System for Cluster
Once the node group is setup, we need to have the manifests file for the cluster, the files are located on a git repository, you the following command on your system to clone it:
git clone https://github.com/Pravesh-Sudha/voting-cloud-native-application.git
cd voting-cloud-native-application/manifest && ll
This command will clone the code and change the location to project directory where you can see the following output:
drwxrwxr-x 4 leefo leefo 4096 Jan 22 15:33 ../
-rw-rw-r-- 1 leefo leefo 1281 Jan 22 15:33 api-deployment.yaml
-rw-rw-r-- 1 leefo leefo  356 Jan 22 15:33 api-service.yaml
-rw-rw-r-- 1 leefo leefo  957 Jan 22 15:33 frontend-deployment.yaml
-rw-rw-r-- 1 leefo leefo  382 Jan 22 15:33 frontend-service.yaml
-rw-rw-r-- 1 leefo leefo  137 Jan 22 15:33 mongo-secret.yaml
-rw-rw-r-- 1 leefo leefo  210 Jan 22 15:33 mongo-service.yaml
-rw-rw-r-- 1 leefo leefo 1466 Jan 22 15:33 mongo-statefulset.yaml
Here you can see the api-deployment.yaml, api-service.yaml, frontend-deployment.yaml, frontend-service.yaml, mongo-secret.yaml, mongo-service.yaml, mongo-statefulset.yaml.
Now, after the node group is created successfully, we will configure our kubectl to use the eks config with our cluster. You can do this by using following command:
aws eks update-kubeconfig --name cloud-native-cluster --region us-east-2In the above command, change the region according to the region in which you created the cluster (in my case, It is Ohio us-east-2)
After the kubeconfig is updated, you can see the following command to check whether your nodes are active or not:
kubectl get nodesThis command will show the following output:

💡 Applying the manifest files
Before applying the files, we need to create a namespace in our cluster, as all the manifest files expected a namespace named cloudchamp in our cluster. We can use the following command to create the namespace:
kubectl create ns cloudchamp
This will create the name space for our cluster, now we will change the directory to our project location and apply some manifest's files:
cd voting-cloud-native-application/manifest
kubectl apply -f mongo-statefulset.yaml
The kubectl apply command will create mongo pods and persistent volume of gp2 of 1 GB in the cloudchamp namespace.
You can see the pod created in cloudchamp namespace with the following command:
kubectl get pods -n cloudchamp -w
To avoid using "-n cloudchamp" every time, we will set the default namespace for our cluster to cloudchamp by using following command:
kubectl config set-context --current --namespace cloudchamp
To expose our deployment, we need to create a headless service which we can do by applying mongo-service.yaml:
kubectl apply -f mongo-service.yaml
After applying the service, we need to have a replica set system in which the mongo-0 pod is our primary pod and other two are secondary, we can do this by following commands:
kubectl exec -it mongo-0 -- mongo

# After getting inside the pod, run these commands:

cat << EOF | kubectl exec -it mongo-0 -- mongo
rs.initiate();
sleep(2000);
rs.add("mongo-1.mongo:27017");
sleep(2000);
rs.add("mongo-2.mongo:27017");
sleep(2000);
cfg = rs.conf();
cfg.members[0].host = "mongo-0.mongo:27017";
rs.reconfig(cfg, {force: true});
sleep(5000);
EOF
In the mongo shell, run the following script to create the database for the voting app:
cat << EOF | kubectl exec -it mongo-0 -- mongo
use langdb;
db.languages.insert({"name" : "csharp", "codedetail" : { "usecase" : "system, web, server-side", "rank" : 5, "compiled" : false, "homepage" : "https://dotnet.microsoft.com/learn/csharp", "download" : "https://dotnet.microsoft.com/download/", "votes" : 0}});
db.languages.insert({"name" : "python", "codedetail" : { "usecase" : "system, web, server-side", "rank" : 3, "script" : false, "homepage" : "https://www.python.org/", "download" : "https://www.python.org/downloads/", "votes" : 0}});
db.languages.insert({"name" : "javascript", "codedetail" : { "usecase" : "web, client-side", "rank" : 7, "script" : false, "homepage" : "https://en.wikipedia.org/wiki/JavaScript", "download" : "n/a", "votes" : 0}});
db.languages.insert({"name" : "go", "codedetail" : { "usecase" : "system, web, server-side", "rank" : 12, "compiled" : true, "homepage" : "https://golang.org", "download" : "https://golang.org/dl/", "votes" : 0}});
db.languages.insert({"name" : "java", "codedetail" : { "usecase" : "system, web, server-side", "rank" : 1, "compiled" : true, "homepage" : "https://www.java.com/en/", "download" : "https://www.java.com/en/download/", "votes" : 0}});
db.languages.insert({"name" : "nodejs", "codedetail" : { "usecase" : "system, web, server-side", "rank" : 20, "script" : false, "homepage" : "https://nodejs.org/en/", "download" : "https://nodejs.org/en/download/", "votes" : 0}});

db.languages.find().pretty();
EOF
After the database is created, we can start with our api but the api-deployment need mongo-secret for creation, we will use the following command in this scenario:
kubectl apply -f mongo-secret.yaml
kubectl apply -f api-deployment.yaml
This will create the pods for api but to expose the pods, we need to have a service which is of Load-balancer, and we can have so with the following command:
kubectl expose deploy api --name=api --type=LoadBalancer --port=80 --target-port=8080
This will create expose your api and create a loadbalancer in your ec2 instance dashboard.
Run the following command to set the enivornment variables for the api service:
{
API_ELB_PUBLIC_FQDN=$(kubectl get svc api -ojsonpath="{.status.loadBalancer.ingress[0].hostname}")
until nslookup $API_ELB_PUBLIC_FQDN >/dev/null 2>&1; do sleep 2 && echo waiting for DNS to propagate...; done
curl $API_ELB_PUBLIC_FQDN/ok
echo
}
This will give an output ok like the image below:
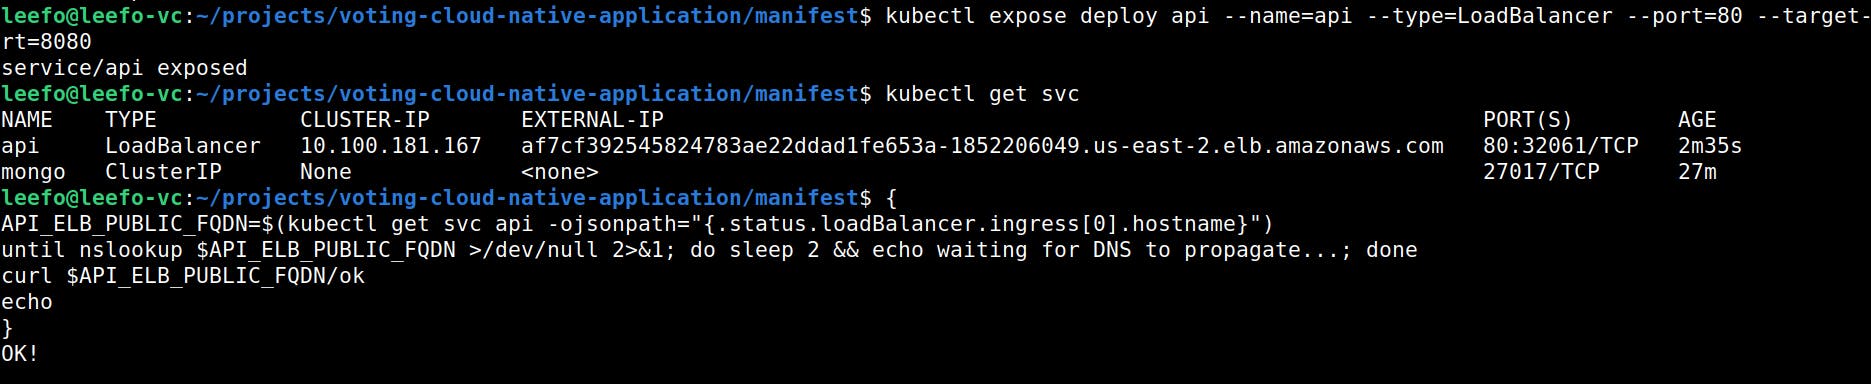
Copy the external-IP of your api service and run it on other tab with /ok in the end, it will display a page with OK! output.
Our backend and API has been Configured correctly, now we are at the last step of deploying our frontend.
💡 Deploying Our Frontend
We will use the following steps to deploy out frontend on EKS Cluster:
Frontend setup
Create the Frontend Deployment resource. In the terminal run the following command:
kubectl apply -f frontend-deployment.yaml
Create a new Service resource of LoadBalancer type. In the terminal run the following command:
kubectl expose deploy frontend --name=frontend --type=LoadBalancer --port=80 --target-port=8080
Confirm that the Frontend ELB is ready to recieve HTTP traffic. In the terminal run the following command:
{
FRONTEND_ELB_PUBLIC_FQDN=$(kubectl get svc frontend -ojsonpath="{.status.loadBalancer.ingress[0].hostname}")
until nslookup $FRONTEND_ELB_PUBLIC_FQDN >/dev/null 2>&1; do sleep 2 && echo waiting for DNS to propagate...; done
curl -I $FRONTEND_ELB_PUBLIC_FQDN
}
Generate the Frontend URL for browsing. In the terminal run the following command:
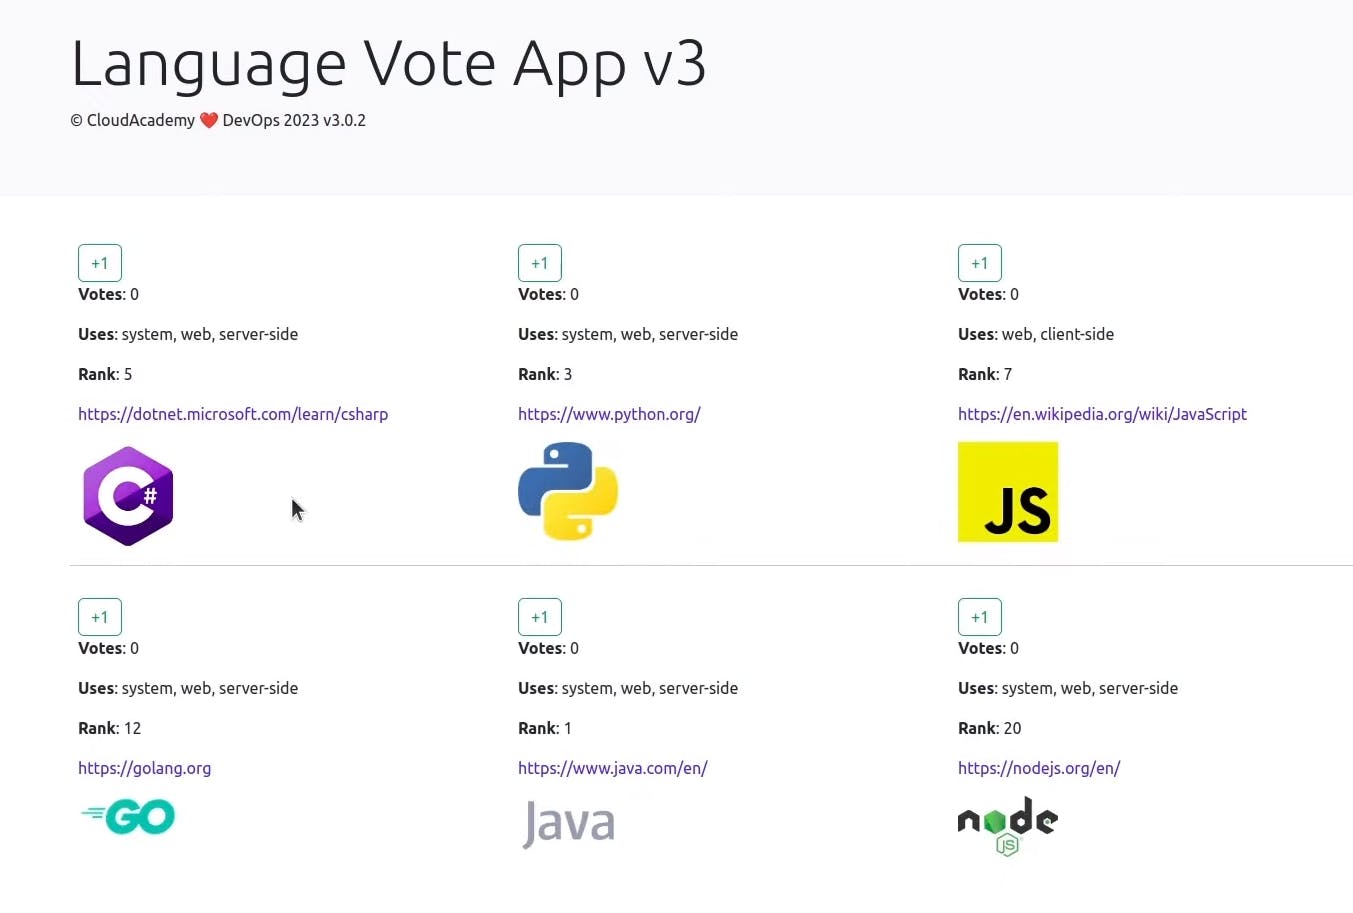
echo http://$FRONTEND_ELB_PUBLIC_FQD
This will generate the URL and just paste the URL and you can see the application running in your system like specified below:
You can Check out the votes in your database with the following command:
kubectl exec -it mongo-0 -- mongo langdb --eval "db.languages.find().pretty()"
💡 Conclusion
In conclusion, this Cloud-Native Web Voting Application with Kubernetes showcases the power and versatility of modern cloud technologies in developing and deploying scalable web applications. By combining technologies such as React, Go, and MongoDB with Kubernetes orchestration, the project delivers a robust and resilient solution. The technical stack, encompassing both frontend and backend components, demonstrates the flexibility and adaptability necessary for building dynamic applications. The utilization of Kubernetes resources, from namespaces for isolation to persistent storage for data integrity, highlights the project's commitment to best practices in cloud-native development.
Furthermore, the project provides valuable learning opportunities, covering key aspects of containerization, Kubernetes orchestration, microservices architecture, database replication, and security practices. Each step, from setting up an EKS cluster to testing the end-to-end functionality, offers a hands-on experience in deploying and managing cloud-native applications. If you like this blog, do follow me on LinkedIn and Twitter, where I post stuff related to DEVOPS and AWS regularly.
Till then, Happy Coding